Photographing Waterfalls, at Ithaca Falls
I got some new gear, and I'm eager to share the results with you.
This is an image of the Ithaca falls, taken using an ND400 filter, a circular polariser, and an intervalometer.
This image was taken on a day with moderate clouds. Now, remember the sunny 16 rule, it's most handy. Since this image was taken in a gorge, in overcast conditions, I would require F4.0 and 1/100s at 100ISO. Now, I used a neutral density filter, which acts like a welding glass, reducing the amount of light through the lens. I used an ND400 filter, which reduces the amount of light to 1/400 of the original intensity. Then, to get a large depth-of-field, I reduced my aperture to F11. Now, F4->F11 means approximately 121/16 = 8 times less light, and my ND filter reduces the light 400 times. This means that I would need to take an exposure lasting 400x8x1/100s = 30 seconds. Of course, this exposure is well within the capabilities of my camera. However, I wanted to capture an HDR image, and hence wanted to push the exposure up to two stops more, which is 2 minutes. Hence, I used a cable intervalometer I purchased from Amazon.
To keep the camera steady, I used a rather cheap tripod by Polaroid. I'm on a limited budget right now, and I plan to upgrade equipment gradually over the next few years. It's foolish to spend around $1000 on equipment all at once.
At the exposure settings I mentioned (F11, 30s, 100ISO), the sky was extremely washed out, and completely overcast. However, I had taken a photograph minutes ago, at 4s exposure, and that served as the perfect image of the sky, because it was relatively free of clouds. The solution? A composite!
Let me describe my workflow in detail. Now, the part of the post written before this line was written just after taking the image, and nearly two months have elapsed before I have a little bit of time to continue with this post. So, just to keep things fresh in my head, I went through my workflow again, and it took around 30 minutes. That's quite low for one image, so you can guess that a minimal amount of manipulation was involved.
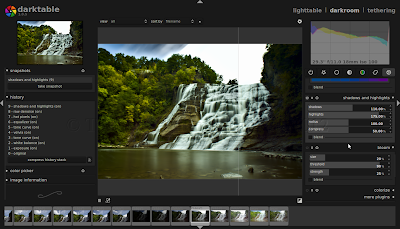
Let's start off by importing the folder in Darktable. You can use your favourite RAW processing software, and mine's Darktable.
I started off with the correctly exposed image which had details for most of the scene except the sky. Of course, the sky is an important element in the image, but it's not central. So, let's process the waterfalls first.
First step, adjust the exposure of the overall image. I like bright images, so I pushed the exposure up.
Next, I adjusted the white balance for a cloudy day. Notice that the water now has a weird yellow-green hue. We'll correct that in a moment.
Adjust the tone curve to add some contrast.
Next, I boost up the vibrance using the Velvia plugin.
However, I think it still needs some colour contrast. This picture was taken around the end of September (yes, wake me up!) and the trees were just getting the beautiful yellow fall colours. I want my photograph to reflect that.Next, I increase the clarity using the equaliser plugin.
So far, so good. Now, to correct the highlights and shadows.
I've never really demonstrated the utility of the highlights and shadows plugin so far, and this is a good place to start. Of course, if you've had any history of image manipulation, you must have used something similar.
Basically, highlights and shadows help compress the tonal range of the highlights and shadows in the image; and this can be used to fit the highlights and shadows in the dynamic range of your display, print, and/or file. In this case, I found that the shadows on the rock face were too dark, so I pushed the shadows up. To show the effect of this plugin, I've split the display with the plugin turned off on the right of the split.
Now that the entire image looks brighter, time to get some details back into the waterfall. Now, that's the central part of the image, and I ought to do it some justice. So, I pushed the highlight recovery slider most of the way to the right, to recover the details in the water. Again, I'm using a split display to show the difference.
The sky still bugs me, so I go back to another image taken minutes ago, when the sky was relatively more clear. This was a shorter exposure, so the sky is darker, and if you look closely, you can see a bunch of guys jumping on the falls (Not sure if that is legal [:)]).
Open the image in Darktable
Perform the same basic image processing operations, like exposure, contrast, vibrance, equaliser; and then switch back to lighttable mode.Select the manipulated images, set export settings, and export the images. Then open them up as layers in GIMP.
I want just the sky from the image on top, so a layer mask is called for. Initialise a layer mask with black. Now, you can go ahead and mask the sky in with white, but painting in the entire sky is a tedious process. So, I use the Lasso select tool and select the sky region freehand using my mouse (yes, I need to buy a Wacom tablet, but, budget...)
Go ahead and bucket-fill the selection with white.Of course, this result is not going to be perfect, so I used a Gaussian Blur on the layer mask
And then used a soft airbrush to blend in the tiny nooks and crevices that I missed with this bulldozer like approach.So, what do you think of this workflow? How would you approach the same photograph? Any nagging questions? Feel free to leave a comment below.


Comments
Post a Comment